Gaming in Android
Follow the below steps to create a simple gaming application in Android.
Create a XML file .
Add the required images file to path
Sample Java file for gaming
package com.kilobolt.robotgame;
import java.util.ArrayList;
import java.util.List;
import java.util.Scanner;
import android.graphics.Color;
import android.graphics.Paint;
import com.kilobolt.framework.Game;
import com.kilobolt.framework.Graphics;
import com.kilobolt.framework.Image;
import com.kilobolt.framework.Input.TouchEvent;
import com.kilobolt.framework.Screen;
public class GameScreen extends Screen {
enum GameState {
Ready, Running, Paused, GameOver
}
GameState state = GameState.Ready;
// Variable Setup
private static Background bg1, bg2;
private static Robot robot;
public static Heliboy hb, hb2;
private Image currentSprite, character, character2, character3, heliboy,
heliboy2, heliboy3, heliboy4, heliboy5;
private Animation anim, hanim;
private ArrayList<Tile> tilearray = new ArrayList<Tile>();
int livesLeft = 1;
Paint paint, paint2;
public GameScreen(Game game) {
super(game);
// Initialize game objects here
bg1 = new Background(0, 0);
bg2 = new Background(2160, 0);
robot = new Robot();
hb = new Heliboy(340, 360);
hb2 = new Heliboy(700, 360);
character = Assets.character;
character2 = Assets.character2;
character3 = Assets.character3;
heliboy = Assets.heliboy;
heliboy2 = Assets.heliboy2;
heliboy3 = Assets.heliboy3;
heliboy4 = Assets.heliboy4;
heliboy5 = Assets.heliboy5;
anim = new Animation();
anim.addFrame(character, 1250);
anim.addFrame(character2, 50);
anim.addFrame(character3, 50);
anim.addFrame(character2, 50);
hanim = new Animation();
hanim.addFrame(heliboy, 100);
hanim.addFrame(heliboy2, 100);
hanim.addFrame(heliboy3, 100);
hanim.addFrame(heliboy4, 100);
hanim.addFrame(heliboy5, 100);
hanim.addFrame(heliboy4, 100);
hanim.addFrame(heliboy3, 100);
hanim.addFrame(heliboy2, 100);
currentSprite = anim.getImage();
loadMap();
// Defining a paint object
paint = new Paint();
paint.setTextSize(30);
paint.setTextAlign(Paint.Align.CENTER);
paint.setAntiAlias(true);
paint.setColor(Color.WHITE);
paint2 = new Paint();
paint2.setTextSize(100);
paint2.setTextAlign(Paint.Align.CENTER);
paint2.setAntiAlias(true);
paint2.setColor(Color.WHITE);
}
private void loadMap() {
ArrayList lines = new ArrayList();
int width = 0;
int height = 0;
Scanner scanner = new Scanner(SampleGame.map);
while (scanner.hasNextLine()) {
String line = scanner.nextLine();
// no more lines to read
if (line == null) {
break;
}
if (!line.startsWith("!")) {
lines.add(line);
width = Math.max(width, line.length());
}
}
height = lines.size();
for (int j = 0; j < 12; j++) {
String line = (String) lines.get(j);
for (int i = 0; i < width; i++) {
if (i < line.length()) {
char ch = line.charAt(i);
Tile t = new Tile(i, j, Character.getNumericValue(ch));
tilearray.add(t);
}
}
}
}
@Override
public void update(float deltaTime) {
List<TouchEvent> touchEvents = game.getInput().getTouchEvents();
// We have four separate update methods in this example.
// Depending on the state of the game, we call different update methods.
// Refer to Unit 3's code. We did a similar thing without separating the
// update methods.
if (state == GameState.Ready)
updateReady(touchEvents);
if (state == GameState.Running)
updateRunning(touchEvents, deltaTime);
if (state == GameState.Paused)
updatePaused(touchEvents);
if (state == GameState.GameOver)
updateGameOver(touchEvents);
}
private void updateReady(List<TouchEvent> touchEvents) {
// This example starts with a "Ready" screen.
// When the user touches the screen, the game begins.
// state now becomes GameState.Running.
// Now the updateRunning() method will be called!
if (touchEvents.size() > 0)
state = GameState.Running;
}
private void updateRunning(List<TouchEvent> touchEvents, float deltaTime) {
// This is identical to the update() method from our Unit 2/3 game.
// 1. All touch input is handled here:
int len = touchEvents.size();
for (int i = 0; i < len; i++) {
TouchEvent event = touchEvents.get(i);
if (event.type == TouchEvent.TOUCH_DOWN) {
if (inBounds(event, 0, 285, 65, 65)) {
robot.jump();
currentSprite = anim.getImage();
robot.setDucked(false);
}
else if (inBounds(event, 0, 350, 65, 65)) {
if (robot.isDucked() == false && robot.isJumped() == false
&& robot.isReadyToFire()) {
robot.shoot();
}
}
else if (inBounds(event, 0, 415, 65, 65)
&& robot.isJumped() == false) {
currentSprite = Assets.characterDown;
robot.setDucked(true);
robot.setSpeedX(0);
}
if (event.x > 400) {
// Move right.
robot.moveRight();
robot.setMovingRight(true);
}
}
if (event.type == TouchEvent.TOUCH_UP) {
if (inBounds(event, 0, 415, 65, 65)) {
currentSprite = anim.getImage();
robot.setDucked(false);
}
if (inBounds(event, 0, 0, 35, 35)) {
pause();
}
if (event.x > 400) {
// Move right.
robot.stopRight();
}
}
}
// 2. Check miscellaneous events like death:
if (livesLeft == 0) {
state = GameState.GameOver;
}
// 3. Call individual update() methods here.
// This is where all the game updates happen.
// For example, robot.update();
robot.update();
if (robot.isJumped()) {
currentSprite = Assets.characterJump;
} else if (robot.isJumped() == false && robot.isDucked() == false) {
currentSprite = anim.getImage();
}
ArrayList projectiles = robot.getProjectiles();
for (int i = 0; i < projectiles.size(); i++) {
Projectile p = (Projectile) projectiles.get(i);
if (p.isVisible() == true) {
p.update();
} else {
projectiles.remove(i);
}
}
updateTiles();
hb.update();
hb2.update();
bg1.update();
bg2.update();
animate();
if (robot.getCenterY() > 500) {
state = GameState.GameOver;
}
}
private boolean inBounds(TouchEvent event, int x, int y, int width,
int height) {
if (event.x > x && event.x < x + width - 1 && event.y > y
&& event.y < y + height - 1)
return true;
else
return false;
}
private void updatePaused(List<TouchEvent> touchEvents) {
int len = touchEvents.size();
for (int i = 0; i < len; i++) {
TouchEvent event = touchEvents.get(i);
if (event.type == TouchEvent.TOUCH_UP) {
if (inBounds(event, 0, 0, 800, 240)) {
if (!inBounds(event, 0, 0, 35, 35)) {
resume();
}
}
if (inBounds(event, 0, 240, 800, 240)) {
nullify();
goToMenu();
}
}
}
}
private void updateGameOver(List<TouchEvent> touchEvents) {
int len = touchEvents.size();
for (int i = 0; i < len; i++) {
TouchEvent event = touchEvents.get(i);
if (event.type == TouchEvent.TOUCH_DOWN) {
if (inBounds(event, 0, 0, 800, 480)) {
nullify();
game.setScreen(new MainMenuScreen(game));
return;
}
}
}
}
private void updateTiles() {
for (int i = 0; i < tilearray.size(); i++) {
Tile t = (Tile) tilearray.get(i);
t.update();
}
}
@Override
public void paint(float deltaTime) {
Graphics g = game.getGraphics();
g.drawImage(Assets.background, bg1.getBgX(), bg1.getBgY());
g.drawImage(Assets.background, bg2.getBgX(), bg2.getBgY());
paintTiles(g);
ArrayList projectiles = robot.getProjectiles();
for (int i = 0; i < projectiles.size(); i++) {
Projectile p = (Projectile) projectiles.get(i);
g.drawRect(p.getX(), p.getY(), 10, 5, Color.YELLOW);
}
// First draw the game elements.
g.drawImage(currentSprite, robot.getCenterX() - 61,
robot.getCenterY() - 63);
g.drawImage(hanim.getImage(), hb.getCenterX() - 48,
hb.getCenterY() - 48);
g.drawImage(hanim.getImage(), hb2.getCenterX() - 48,
hb2.getCenterY() - 48);
// Example:
// g.drawImage(Assets.background, 0, 0);
// g.drawImage(Assets.character, characterX, characterY);
// Secondly, draw the UI above the game elements.
if (state == GameState.Ready)
drawReadyUI();
if (state == GameState.Running)
drawRunningUI();
if (state == GameState.Paused)
drawPausedUI();
if (state == GameState.GameOver)
drawGameOverUI();
}
private void paintTiles(Graphics g) {
for (int i = 0; i < tilearray.size(); i++) {
Tile t = (Tile) tilearray.get(i);
if (t.type != 0) {
g.drawImage(t.getTileImage(), t.getTileX(), t.getTileY());
}
}
}
public void animate() {
anim.update(10);
hanim.update(50);
}
private void nullify() {
// Set all variables to null. You will be recreating them in the
// constructor.
paint = null;
bg1 = null;
bg2 = null;
robot = null;
hb = null;
hb2 = null;
currentSprite = null;
character = null;
character2 = null;
character3 = null;
heliboy = null;
heliboy2 = null;
heliboy3 = null;
heliboy4 = null;
heliboy5 = null;
anim = null;
hanim = null;
// Call garbage collector to clean up memory.
System.gc();
}
private void drawReadyUI() {
Graphics g = game.getGraphics();
g.drawARGB(155, 0, 0, 0);
g.drawString("Tap to Start.", 400, 240, paint);
}
private void drawRunningUI() {
Graphics g = game.getGraphics();
g.drawImage(Assets.button, 0, 285, 0, 0, 65, 65);
g.drawImage(Assets.button, 0, 350, 0, 65, 65, 65);
g.drawImage(Assets.button, 0, 415, 0, 130, 65, 65);
g.drawImage(Assets.button, 0, 0, 0, 195, 35, 35);
}
private void drawPausedUI() {
Graphics g = game.getGraphics();
// Darken the entire screen so you can display the Paused screen.
g.drawARGB(155, 0, 0, 0);
g.drawString("Resume", 400, 165, paint2);
g.drawString("Menu", 400, 360, paint2);
}
private void drawGameOverUI() {
Graphics g = game.getGraphics();
g.drawRect(0, 0, 1281, 801, Color.BLACK);
g.drawString("GAME OVER.", 400, 240, paint2);
g.drawString("Tap to return.", 400, 290, paint);
}
@Override
public void pause() {
if (state == GameState.Running)
state = GameState.Paused;
}
@Override
public void resume() {
if (state == GameState.Paused)
state = GameState.Running;
}
@Override
public void dispose() {
}
@Override
public void backButton() {
pause();
}
private void goToMenu() {
// TODO Auto-generated method stub
game.setScreen(new MainMenuScreen(game));
}
public static Background getBg1() {
// TODO Auto-generated method stub
return bg1;
}
public static Background getBg2() {
// TODO Auto-generated method stub
return bg2;
}
public static Robot getRobot() {
// TODO Auto-generated method stub
return robot;
}
}
Add Permissions in Manifest file:
Run Application in Android Emulator
The Sample Output images,,


Follow the below steps to create a simple gaming application in Android.
Step1:
Create a XML file .
Step 2:
Add the required images file to path
Step 3:
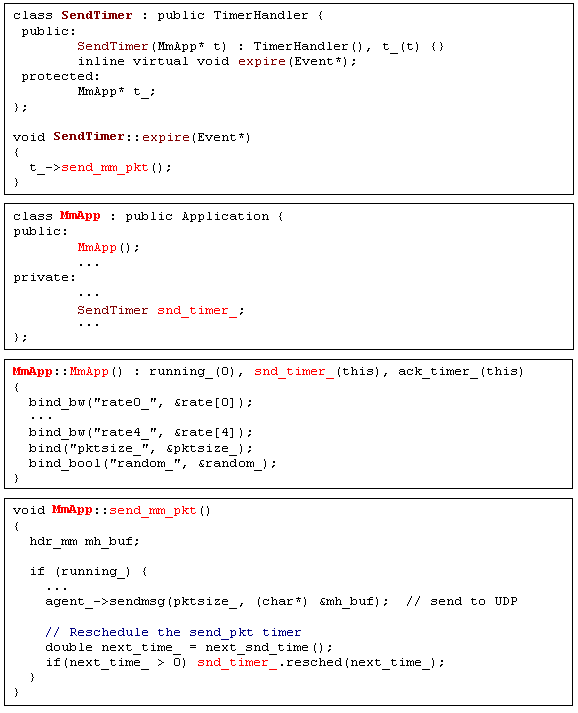
Sample Java file for gaming
package com.kilobolt.robotgame;
import java.util.ArrayList;
import java.util.List;
import java.util.Scanner;
import android.graphics.Color;
import android.graphics.Paint;
import com.kilobolt.framework.Game;
import com.kilobolt.framework.Graphics;
import com.kilobolt.framework.Image;
import com.kilobolt.framework.Input.TouchEvent;
import com.kilobolt.framework.Screen;
public class GameScreen extends Screen {
enum GameState {
Ready, Running, Paused, GameOver
}
GameState state = GameState.Ready;
// Variable Setup
private static Background bg1, bg2;
private static Robot robot;
public static Heliboy hb, hb2;
private Image currentSprite, character, character2, character3, heliboy,
heliboy2, heliboy3, heliboy4, heliboy5;
private Animation anim, hanim;
private ArrayList<Tile> tilearray = new ArrayList<Tile>();
int livesLeft = 1;
Paint paint, paint2;
public GameScreen(Game game) {
super(game);
// Initialize game objects here
bg1 = new Background(0, 0);
bg2 = new Background(2160, 0);
robot = new Robot();
hb = new Heliboy(340, 360);
hb2 = new Heliboy(700, 360);
character = Assets.character;
character2 = Assets.character2;
character3 = Assets.character3;
heliboy = Assets.heliboy;
heliboy2 = Assets.heliboy2;
heliboy3 = Assets.heliboy3;
heliboy4 = Assets.heliboy4;
heliboy5 = Assets.heliboy5;
anim = new Animation();
anim.addFrame(character, 1250);
anim.addFrame(character2, 50);
anim.addFrame(character3, 50);
anim.addFrame(character2, 50);
hanim = new Animation();
hanim.addFrame(heliboy, 100);
hanim.addFrame(heliboy2, 100);
hanim.addFrame(heliboy3, 100);
hanim.addFrame(heliboy4, 100);
hanim.addFrame(heliboy5, 100);
hanim.addFrame(heliboy4, 100);
hanim.addFrame(heliboy3, 100);
hanim.addFrame(heliboy2, 100);
currentSprite = anim.getImage();
loadMap();
// Defining a paint object
paint = new Paint();
paint.setTextSize(30);
paint.setTextAlign(Paint.Align.CENTER);
paint.setAntiAlias(true);
paint.setColor(Color.WHITE);
paint2 = new Paint();
paint2.setTextSize(100);
paint2.setTextAlign(Paint.Align.CENTER);
paint2.setAntiAlias(true);
paint2.setColor(Color.WHITE);
}
private void loadMap() {
ArrayList lines = new ArrayList();
int width = 0;
int height = 0;
Scanner scanner = new Scanner(SampleGame.map);
while (scanner.hasNextLine()) {
String line = scanner.nextLine();
// no more lines to read
if (line == null) {
break;
}
if (!line.startsWith("!")) {
lines.add(line);
width = Math.max(width, line.length());
}
}
height = lines.size();
for (int j = 0; j < 12; j++) {
String line = (String) lines.get(j);
for (int i = 0; i < width; i++) {
if (i < line.length()) {
char ch = line.charAt(i);
Tile t = new Tile(i, j, Character.getNumericValue(ch));
tilearray.add(t);
}
}
}
}
@Override
public void update(float deltaTime) {
List<TouchEvent> touchEvents = game.getInput().getTouchEvents();
// We have four separate update methods in this example.
// Depending on the state of the game, we call different update methods.
// Refer to Unit 3's code. We did a similar thing without separating the
// update methods.
if (state == GameState.Ready)
updateReady(touchEvents);
if (state == GameState.Running)
updateRunning(touchEvents, deltaTime);
if (state == GameState.Paused)
updatePaused(touchEvents);
if (state == GameState.GameOver)
updateGameOver(touchEvents);
}
private void updateReady(List<TouchEvent> touchEvents) {
// This example starts with a "Ready" screen.
// When the user touches the screen, the game begins.
// state now becomes GameState.Running.
// Now the updateRunning() method will be called!
if (touchEvents.size() > 0)
state = GameState.Running;
}
private void updateRunning(List<TouchEvent> touchEvents, float deltaTime) {
// This is identical to the update() method from our Unit 2/3 game.
// 1. All touch input is handled here:
int len = touchEvents.size();
for (int i = 0; i < len; i++) {
TouchEvent event = touchEvents.get(i);
if (event.type == TouchEvent.TOUCH_DOWN) {
if (inBounds(event, 0, 285, 65, 65)) {
robot.jump();
currentSprite = anim.getImage();
robot.setDucked(false);
}
else if (inBounds(event, 0, 350, 65, 65)) {
if (robot.isDucked() == false && robot.isJumped() == false
&& robot.isReadyToFire()) {
robot.shoot();
}
}
else if (inBounds(event, 0, 415, 65, 65)
&& robot.isJumped() == false) {
currentSprite = Assets.characterDown;
robot.setDucked(true);
robot.setSpeedX(0);
}
if (event.x > 400) {
// Move right.
robot.moveRight();
robot.setMovingRight(true);
}
}
if (event.type == TouchEvent.TOUCH_UP) {
if (inBounds(event, 0, 415, 65, 65)) {
currentSprite = anim.getImage();
robot.setDucked(false);
}
if (inBounds(event, 0, 0, 35, 35)) {
pause();
}
if (event.x > 400) {
// Move right.
robot.stopRight();
}
}
}
// 2. Check miscellaneous events like death:
if (livesLeft == 0) {
state = GameState.GameOver;
}
// 3. Call individual update() methods here.
// This is where all the game updates happen.
// For example, robot.update();
robot.update();
if (robot.isJumped()) {
currentSprite = Assets.characterJump;
} else if (robot.isJumped() == false && robot.isDucked() == false) {
currentSprite = anim.getImage();
}
ArrayList projectiles = robot.getProjectiles();
for (int i = 0; i < projectiles.size(); i++) {
Projectile p = (Projectile) projectiles.get(i);
if (p.isVisible() == true) {
p.update();
} else {
projectiles.remove(i);
}
}
updateTiles();
hb.update();
hb2.update();
bg1.update();
bg2.update();
animate();
if (robot.getCenterY() > 500) {
state = GameState.GameOver;
}
}
private boolean inBounds(TouchEvent event, int x, int y, int width,
int height) {
if (event.x > x && event.x < x + width - 1 && event.y > y
&& event.y < y + height - 1)
return true;
else
return false;
}
private void updatePaused(List<TouchEvent> touchEvents) {
int len = touchEvents.size();
for (int i = 0; i < len; i++) {
TouchEvent event = touchEvents.get(i);
if (event.type == TouchEvent.TOUCH_UP) {
if (inBounds(event, 0, 0, 800, 240)) {
if (!inBounds(event, 0, 0, 35, 35)) {
resume();
}
}
if (inBounds(event, 0, 240, 800, 240)) {
nullify();
goToMenu();
}
}
}
}
private void updateGameOver(List<TouchEvent> touchEvents) {
int len = touchEvents.size();
for (int i = 0; i < len; i++) {
TouchEvent event = touchEvents.get(i);
if (event.type == TouchEvent.TOUCH_DOWN) {
if (inBounds(event, 0, 0, 800, 480)) {
nullify();
game.setScreen(new MainMenuScreen(game));
return;
}
}
}
}
private void updateTiles() {
for (int i = 0; i < tilearray.size(); i++) {
Tile t = (Tile) tilearray.get(i);
t.update();
}
}
@Override
public void paint(float deltaTime) {
Graphics g = game.getGraphics();
g.drawImage(Assets.background, bg1.getBgX(), bg1.getBgY());
g.drawImage(Assets.background, bg2.getBgX(), bg2.getBgY());
paintTiles(g);
ArrayList projectiles = robot.getProjectiles();
for (int i = 0; i < projectiles.size(); i++) {
Projectile p = (Projectile) projectiles.get(i);
g.drawRect(p.getX(), p.getY(), 10, 5, Color.YELLOW);
}
// First draw the game elements.
g.drawImage(currentSprite, robot.getCenterX() - 61,
robot.getCenterY() - 63);
g.drawImage(hanim.getImage(), hb.getCenterX() - 48,
hb.getCenterY() - 48);
g.drawImage(hanim.getImage(), hb2.getCenterX() - 48,
hb2.getCenterY() - 48);
// Example:
// g.drawImage(Assets.background, 0, 0);
// g.drawImage(Assets.character, characterX, characterY);
// Secondly, draw the UI above the game elements.
if (state == GameState.Ready)
drawReadyUI();
if (state == GameState.Running)
drawRunningUI();
if (state == GameState.Paused)
drawPausedUI();
if (state == GameState.GameOver)
drawGameOverUI();
}
private void paintTiles(Graphics g) {
for (int i = 0; i < tilearray.size(); i++) {
Tile t = (Tile) tilearray.get(i);
if (t.type != 0) {
g.drawImage(t.getTileImage(), t.getTileX(), t.getTileY());
}
}
}
public void animate() {
anim.update(10);
hanim.update(50);
}
private void nullify() {
// Set all variables to null. You will be recreating them in the
// constructor.
paint = null;
bg1 = null;
bg2 = null;
robot = null;
hb = null;
hb2 = null;
currentSprite = null;
character = null;
character2 = null;
character3 = null;
heliboy = null;
heliboy2 = null;
heliboy3 = null;
heliboy4 = null;
heliboy5 = null;
anim = null;
hanim = null;
// Call garbage collector to clean up memory.
System.gc();
}
private void drawReadyUI() {
Graphics g = game.getGraphics();
g.drawARGB(155, 0, 0, 0);
g.drawString("Tap to Start.", 400, 240, paint);
}
private void drawRunningUI() {
Graphics g = game.getGraphics();
g.drawImage(Assets.button, 0, 285, 0, 0, 65, 65);
g.drawImage(Assets.button, 0, 350, 0, 65, 65, 65);
g.drawImage(Assets.button, 0, 415, 0, 130, 65, 65);
g.drawImage(Assets.button, 0, 0, 0, 195, 35, 35);
}
private void drawPausedUI() {
Graphics g = game.getGraphics();
// Darken the entire screen so you can display the Paused screen.
g.drawARGB(155, 0, 0, 0);
g.drawString("Resume", 400, 165, paint2);
g.drawString("Menu", 400, 360, paint2);
}
private void drawGameOverUI() {
Graphics g = game.getGraphics();
g.drawRect(0, 0, 1281, 801, Color.BLACK);
g.drawString("GAME OVER.", 400, 240, paint2);
g.drawString("Tap to return.", 400, 290, paint);
}
@Override
public void pause() {
if (state == GameState.Running)
state = GameState.Paused;
}
@Override
public void resume() {
if (state == GameState.Paused)
state = GameState.Running;
}
@Override
public void dispose() {
}
@Override
public void backButton() {
pause();
}
private void goToMenu() {
// TODO Auto-generated method stub
game.setScreen(new MainMenuScreen(game));
}
public static Background getBg1() {
// TODO Auto-generated method stub
return bg1;
}
public static Background getBg2() {
// TODO Auto-generated method stub
return bg2;
}
public static Robot getRobot() {
// TODO Auto-generated method stub
return robot;
}
}
Step 5:
Add Permissions in Manifest file:
<manifest xmlns:android="http://schemas.android.com/apk/res/android"

    package="com.kilobolt.robotgame"

    android:versionCode="1"

    android:versionName="1.0" >


    <uses-permission android:name="android.permission.WAKE_LOCK" />

    <uses-permission android:name="android.permission.WRITE_EXTERNAL_STORAGE" />

    <uses-permission android:name="android.permission.VIBRATE" />


    <uses-sdk

        android:minSdkVersion="8"

        android:targetSdkVersion="17" />


    <application

        android:icon="@drawable/icon"

        android:label="RobotGame" >

        <activity

            android:name=".SampleGame"

            android:configChanges="keyboard|keyboardHidden|orientation"

            android:label="RobotGame"

            android:screenOrientation="landscape" >

            <intent-filter>

                <action android:name="android.intent.action.MAIN" />


                <category android:name="android.intent.category.LAUNCHER" />

            </intent-filter>

        </activity>

    </application>


</manifest>
Step 6:
Run Application in Android Emulator
The Sample Output images,,