Thursday 30 January 2014

Download and Installation of Redhat, fedora, Ubunthu and Vmware AND ns2


  NS2.34

·        Use following link in your browser (ctrl+click following link)

·        After  page was loaded it will directly download (in some browser download dialogue box will open)
==========================================

Utorrent  download

·        Use following link in your browser (ctrl+click following link)

      After loaded the page click on “Download Now“ for µTorrent Stable (3.3.1 build 29812) 
        It will Start Download.

        Install the downloaded file
==================================================

     VMware Workstation download
        Use following link in your browser (ctrl+click following link)
        

·        It will start download torrent file. After finished downloading double click on it.
·        Next window will be open as below Click  “OK”  as shown below, Torrent will start download the VMware Workstation9

·        After Finishing download start Install
===============================
:
    Redhat Linux 32bit Download
·        Use following link in your browser (ctrl+click following link)
·     
·        It will start download the torrent link. After downloaded double click on link
·        It will start download the file.
=============================================

    Redhat Linux 64bit Download
·        Use following link in your browser (ctrl+click following link)
·   

·        It will start download the torrent link. After downloaded double click on link
·        It will start download the file
=======================================
    Ubuntu Linux 32bit Download
·        Use following link in your browser (ctrl+click following link)
·      
·        It will start download the torrent link. After downloaded double click on link
·        It will start download the file

    Ubuntu Linux 64bit Download
·        Use following link in your browser (ctrl+click following link)
·        
·        It will start download the torrent link. After downloaded double click on link
·        It will start download the file
==============================================

    CentOS Linux 32bit Download
·        Use following link in your browser (ctrl+click following link)

·        It will start download the torrent link. After downloaded double click on link
·        It will start download the file
=============================================


    CentOS Linux 64bit Download
·        Use following link in your browser (ctrl+click following link)

·        It will start download the torrent link. After downloaded double click on link
·        It will start download the file
=============================================


    Fedora Linux 32bit Download
·        Use following link in your browser (ctrl+click following link)
·                It will start download the torrent link. After downloaded double click on link
·        It will start download the file
===============================================


    Fedora Linux 64bit Download
·        Use following link in your browser (ctrl+click following link)

· It will start download the torrent link. After downloaded double click on link
·        It will start download the file
======================================
Add New Queue in NS2

Add New Queue


  • Objective
  • To build a simple drop-tail router output queue that uses a round-robin dequeue scheduling for priority 15 packets (from a "MmApp" over "UDPmm") and the other packets in the queue. That is, while priority 15 packets and other packets coexist in the queue, it dequeues the oldest packets of each type one by one in turn.


  • Design
  • The queue has two logical FIFO queues, say LQ1 and LQ2, of which the total size is equal to the size of physical queue (PQ), i.e. LQ1 + LQ2 = PQ. To implement a normal drop-tail enqueue behavior, when a packet is to be enqueued, the enqueue manager checks if size of LQ1 + LQ2 is less than maximum allowed PQ size. If so, the packet will be enqueued to an appropriate logical queue. To implement the round-robin dequeue scheduling, the dequeue manager tries to dequeue one packet from a logical queue and the next one from the other logical queue in turn. I.e. packets in the two logical queues are dequeued at 1:1 ratio if both queues have packets.


  • Implementation
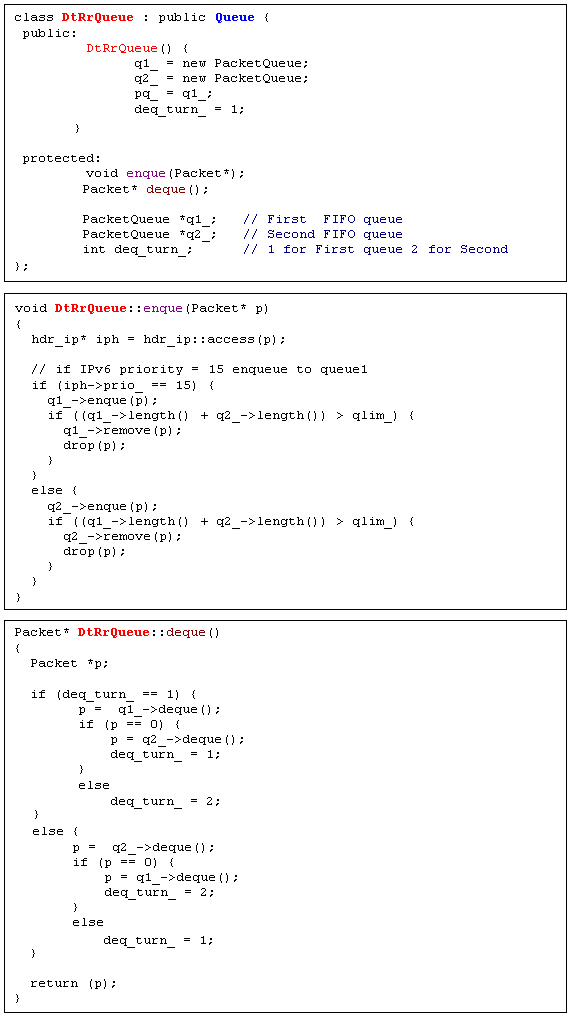
  • We named the C++ name for this queue object "DtRrQueue" (Drop-Tail Round-Robin Queue) that is derived from "Queue" class. The matching OTcl name is "Queue/DTRR". When the "recv" member function that is implemented in the "Queue" class (in "queue.cc") receives a packet, it invokes the "enqueue" member function of the queue object and invokes "dequeue" if the link object is not blocked. When the link came from a blocked state, it also calls the "dequeue" member function of its queue object. Therefore, we needed to write "enqueue" and "dequeue" member functions of the "DtRrQueue" object class. Figure 30 shows the "DtRrQueue" class definition and its "enqueue" and "dequeue" member functions. For the complete implementation, refer to "dtrr-queue.h" and "dtrr-queue.cc" files. Since the codes are really easy to understand, no further explanation is given.


    Figure 30. "DtRrQueue" class implementation


  • Test Simulation
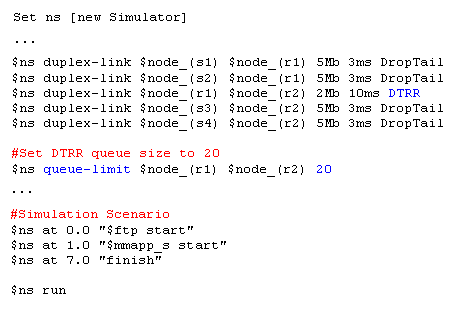
  • We used the simulation script used for testing "MmApp" over "UDPmm" in the previous section with changing the RED queue to DTRR queue for the link r1-r2. The changes to the script are show in Figure 31. Download this script and test your newly added queue components.

    ex-dtrr-queue.tcl

    Figure 31. "DtRrQueue" test simulation script

    Web Server and Clients in NS2

    Web Server Example


    This section contains a pointer to an example Web Server simulation script and shows its network topology. Download "ex-web.tcl" and "dumbbell.tcl" files and examine them yourself. This example is from the 5th VINT/NS Simulator Tutorial/Workshop. Note that you should change the path for "http-mod.tcl" at the begining of the script to an appropriate one to make it run on your machine.


    Figure 34. Web server simulation network topology

    Add New Agents in NS2

    Add New Application and Agent


  • Objective
  • We want to build a multimedia application that runs over a UDP connection, which simulates the behavior of an imaginary multimedia application that implements "five rate media scaling" that can respond to network congestion to some extent by changing encoding and transmission policy pairs associated with scale parameter values.

  • Application Description
  • In this implementation, it is assumed that when a connection is established, the sender and the receiver agree on 5 different sets of encoding and transmission policy pairs, and associate them with 5 scale values (0-4). For simplicity reasons, it is also assumed that a constant transmission rate is determined for each of the encoding and transmission policy pairs, and every pair uses packets of the same size regardless of the encoding scheme.
    Basically, "five rate media scaling" works as follow. The sender starts with transmission rate associated with scale 0, and changes transmission rates according to the scale value that the receiver notifies. The receiver is responsible for monitoring network congestion and determining the scale factor. For congestion monitoring, a simple periodical (for every RTT second) packet loss monitoring is used, and even a single packet loss for each period is regarded as network congestion. If congestion is detected, the receiver reduces the scale parameter value to half and notifies the sender of this value. If no packet loss is detected, the receiver increases the value by one and notifies the sender.

  • Problem Analysis
  • Before implementing this application, the UDP agent implementation is examined and one major problem is found. Since a UDP agent allocates and sends network packets, all the information needed for application level communication should be handed to the UDP agent as a data stream. However, the UDP implementation allocates packets that only have a header stack. Therefore, we need to modify the UDP implementation to add a mechanism to send the data received from the application. It is also noted that we might want to use this application for further research on IP router queue management mechanisms. Therefore, we need a way to distinguish this type of multimedia stream from other types of streams. That is, we also need to modify UDP agent to record data type in one of IP header fields that is currently not used.

  • Note on NS Versions
  • The locations of C++ source files in NS version 2.1b9a are slightly changed from 2.1b8a. In ns-2.1b9a, C++ source files are categorized and placed in sub-directories under the main ns-2 directory. For example, "packet.h" to "common/packet.h", "agent.h" to "common/agent.h" and "app.h" is moved to "apps/app.h". However, the locations of OTcl files are same as before ("tcl/lib/ns-packet.tcl", "tcl/lib/ns-default.tcl" and etc.)
  • Design and Implementation
  • For the application, we decided to take the CBR implementation and modify it to have the "five level media scaling" feature. We examined the C++ class hierarchy, and decided to name the class of this application as "MmApp" and implement as a child class of "Application". The matching OTcl hierarchy name is "Application/MmApp". The sender and receiver behavior of the application is implemented together in "MmApp". For the modified UDP agent that supports "MmApp", we decided to name it "UdpMmAgent" and implement it as a child class of "UdpAgent". The matching OTcl hierarchy name is "Agent/UDP/UDPmm"
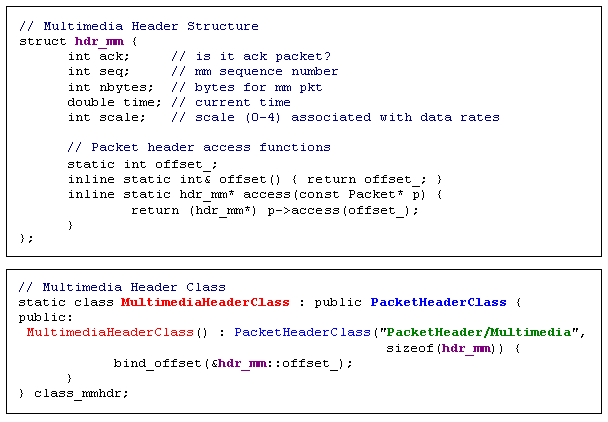
    • MmApp Header: For the application level communication, we decided to define a header of which the structure named in C++ "hdr_mm". Whenever the application has information to transmit, it will hand it to "UdpMmAgent" in the "hdr_mm" structure format. Then, "UdpMmAgent" allocates one or more packets (depending on the simulated data packet size) and writes the data to the multimedia header of each packet. Figure 23 shows the header definition, in which a structure for the header and a header class object, "MultimediaHeaderClass" that should be derived from "PacketHeaderCalss" is defined. In defining this class, the OTcl name for the header ("PacketHeader/Multimedia") and the size of the header structure defined are presented. Notice that bind_offset() must be called in the constructor of this class.

      Figure 23. MM Header Structure & Class (in "udp-mm.h" & "udp-mm.cc")


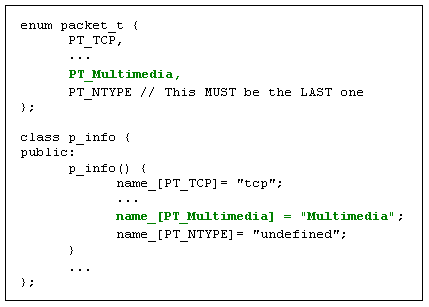
      Figure 24 (a). Add to the "packet.h" file (C++)

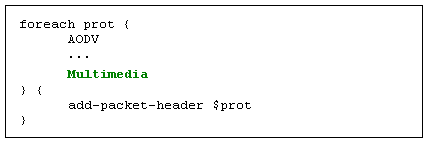
      Figure 24 (b). Add to the "ns-packet.tcl" file (Otcl)
      We also add lines to packet.h and ns-packet.tcl as shown in Figure 24 (a) and (b) to add our "Mulltimedia" header to the header stack. At this point, the header creation process is finished, and "UdpMmAgent" will access the new header via hdr_mm::access() member function. Please refer to NS Manual for detailed information on header creation and access methods. For the rest of the application and the modified UDP agent description, refer directly to "mm-app.h", "mm-app.cc", "udp-mm.h" and "udp-mm.cc" files as needed.
       
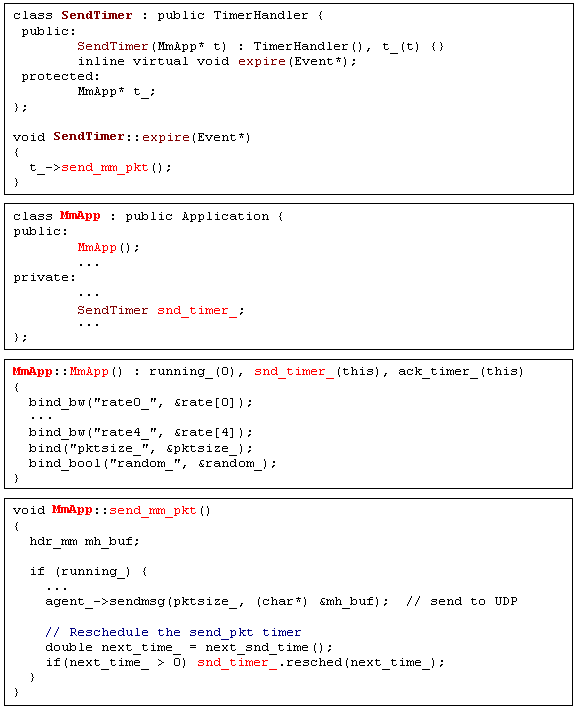
    • MmApp Sender: The sender uses a timer for scheduling the next application data packet transmission. We defined the "SendTimer" class derived from the "TimerHandler" class, and wrote its "expire()" member function to call "send_mm_pkt()" member function of the "MmApp" object. Then, we included an instance of this object as a private member of "MmApp" object referred to as "snd_timer_". Figure 25 shows the "SendTimer" implementation.

      Figure 25. SendTimer Implementation.
      Before setting this timer, "MmApp" re-calculates the next transmission time using the transmission rate associated with the current scale value and the size of application data packet that is given in the input simulation script (or use the default size). The "MmApp" sender, when an ACK application packet arrives from the receiver side, updates the scale parameter.
       
    • MmApp Receiver: The receiver uses a timer, named "ack_timer_", to schedule the next application ACK packet transmission of which the interval is equal to the mean RTT. When receiving an application data packet from the sender, the receiver counts the number of received packets and also counts the number of lost packets using the packet sequence number. When the "ack_timer_" expires, it invokes the "send_ack_pkt" member function of "MmApp", which adjusts the scale value looking at the received and lost packet accounting information, resets the received and lost count to 0, and sends an ACK packet with the adjusted scale value. Note that the receiver doesn't have any connection establishment or closing methods. Therefore, starting from the first packet arrival, the receiver periodically sends ACK packets and never stops (this is a bug).
       
    • UdpMmAgent: The "UdpMmAgent" is modified from the "UdpAgent" to have the following additional features: (1) writing to the sending data packet MM header the information received from a "MmApp" (or reading information from the received data packet MM header and handing it to the "MmApp"), (2) segmentation and re-assembly ("UdpAgent" only implements segmentation), and (3) setting the priority bit (IPv6) to 15 (max priority) for the "MmApp" packets.
       
    • Modify "agent.h": To make the new application and agent running with your NS distribution, you should add two methods to "Agent" class as public. In the "command" member function of the "MmApp" class, there defined an "attach-agent" OTcl command. When this command is received from OTcl, "MmApp" tries to attach itself to the underlying agent. Before the attachment, it invokes the "supportMM()" member function of the underlying agent to check if the underlying agent support for multimedia transmission (i.e. can it carry data from application to application), and invokes "enableMM()" if it does. Even though these two member functions are defined in the "UdpMmAgnet" class, it is not defined in its base ancestor "Agent" class, and the two member functions of the general "Agent" class are called. Therefore, when trying to compile the code, it will give an error message. Inserting the two methods as public member functions of the "Agent" class (in "agent.h") as follows will solve this problem.

      Figure 26 (a). Add two member functions to "Agent" class.
    • Modify "app.h": You also need to add an additional member function "recv_msg(int nbytes, const char *msg)" to "Application" class as shown in Figure 26 (b). This member function, which was included in the "Application" class in the old versions of NS (ns-2.1b4a for sure), is removed from the class in the latest versions (ns-2.1b8a for sure). Our multimedia application was initially written for the ns-2.1.b4a, and therefore requires "Application::recv_msg()" member function for ns-2.1b8a or later versions.

      Figure 26 (b). Add a member function to "Application" class.
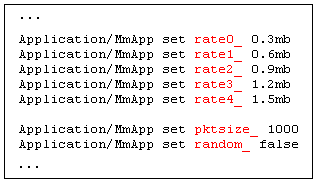
    • Set default values for new parameter in the "ns-default.tcl": After implementing all the parts of the application and agent, the last thing to do is to set default values for the newly introduced configurable parameters in the "ns-default.tcl" file. Figure 26 shows an example of setting the default values for configurable parameters introduced by "MmApp".

      Figure 27. Default parameter value settings

  • Download and Compile
  • Here is a checklist that should be done before recompiling your NS.
    1. Download "mm-app.h", "mm-app.cc", "udp-mm.h" and "udp-mm.cc") to the "ns-2" directory.
    2. Make sure you registered the new application header by modifying "packet.h" and "ns-packet.tcl" as shown in Figure 24 (a) and (b).
    3. Add supportMM() and enableMM() methods to the "Agent" class in "agent.h" as shown in Figure 26 (a).
    4. Add recv_msg() method to the "Application" class in "app.h" as shown in Figure 26 (b).
    5. Set default values for the newly introduced configurable parameters in "ns-default.tcl" as described in Figure 27. Be SURE to complete this last step. Otherwise, all five-scale rates are initialized to zero unless specified in the input simulation script (i.e., the test simulation script given below will not transmit any frames).
    Be SURE to complete the last (5th) step. Otherwise, all five-scale rates are initialized to zero unless specifically given in the input simulation script (i.e., the test simulation script given below will not transmit any frames).

    After you've done all things in the checklist, modify your "Makefile" as needed (include "mm-app.o" and "udp-mm.o" in the object file list) and re-compile your NS. Be SURE to run "make clean" and "make depend" before you re-compile your modified NS, otherwise the new application may not transmit any packets. It is generally a good practice to do "make depend" after you make changes in "Makefile" before a re-compile.

  • Test Simulation
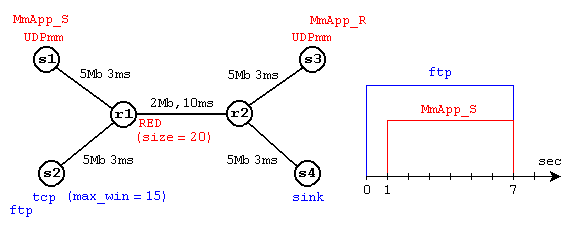
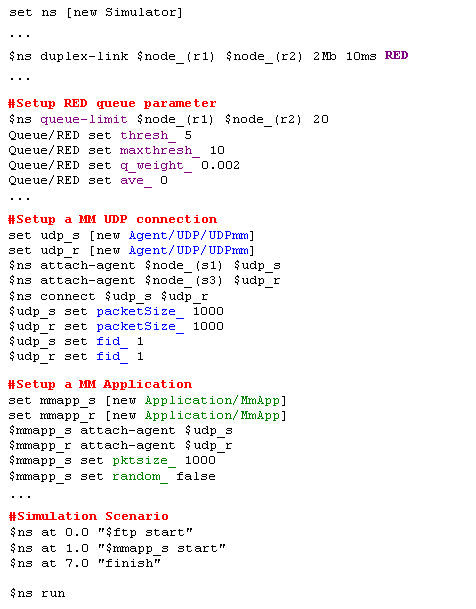
  • Figure 28 shows a simulation topology and scenario that is used to test "MmApp", and Figure 29 shows the test simulation script. Download this script and test the newly added components.

    Figure 28. Test Simulation Topology and Scenario

    ex-mm-app.tcl

    Figure 29. "MmApp" Test Simulation Script

    Trace File Analysis in NS2

    Trace Analysis Example


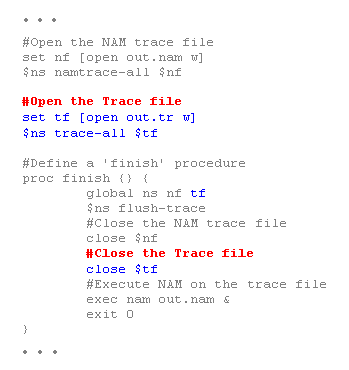
    This section shows a trace analysis example. Example 4 is the same OTcl script as the one in the "Simple Simulation Example" section with a few lines added to open a trace file and write traces to it. For the network topology it generates and the simulation scenario, refer to Figure 4 in the "Simple Simulation Example" section. To run this script download "ns-simple-trace.tcl" and type "ns ns-simple-trace.tcl" at your shell prompt.
    ns-simple-trace.tcl

    Example 4. Trace Enabled Simple NS Simulation Script (modified from Example 3)
    Running the above script generates a NAM trace file that is going to be used as an input to NAM and a trace file called "out.tr" that will be used for our simulation analysis. Figure 13 shows the trace format and example trace data from "out.tr".


    Figure 13. Trace Format Example
    Each trace line starts with an event (+, -, d, r) descriptor followed by the simulation time (in seconds) of that event, and from and to node, which identify the link on which the event occurred. Look at Figure 9 in the "Network Components" section to see where in a link each type of event is traced. The next information in the line before flags (appeared as "------" since no flag is set) is packet type and size (in Bytes). Currently, NS implements only the Explicit Congestion Notification (ECN) bit, and the remaining bits are not used. The next field is flow id (fid) of IPv6 that a user can set for each flow at the input OTcl script. Even though fid field may not used in a simulation, users can use this field for analysis purposes. The fid field is also used when specifying stream color for the NAM display. The next two fields are source and destination address in forms of "node.port". The next field shows the network layer protocol's packet sequence number. Note that even though UDP implementations do not use sequence number, NS keeps track of UDP packet sequence number for analysis purposes. The last field shows the unique id of the packet.
    Having simulation trace data at hand, all one has to do is to transform a subset of the data of interest into a comprehensible information and analyze it. Down below is a small data transformation example. This example uses a command written in perl called "column" that selects columns of given input. To make the example work on your machine, you should download "column" and make it executable (i.e. "chmod 755 column"). Following is a tunneled shell command combined with awk, which calculates CBR traffic jitter at receiver node (n3) using data in "out.tr", and stores the resulting data in "jitter.txt".
    cat out.tr | grep " 2 3 cbr " | grep ^r | column 1 10 | awk '{dif = $2 - old2; if(dif==0) dif = 1; if(dif > 0) {printf("%d\t%f\n", $2, ($1 - old1) / dif); old1 = $1; old2 = $2}}' > jitter.txt
    This shell command selects the "CBR packet receive" event at n3, selects time (column 1) and sequence number (column 10), and calculates the difference from last packet receive time divided by difference in sequence number (for loss packets) for each sequence number. The following is the corresponding jitter graph that is generated using gnuplot. The X axis show the packet sequence number and the Y axis shows simulation time in seconds.

    Awk Script To calculate Energy Level From Ns2 Trace Files

    Use the Below Awk script to  calculate Energy Level From Ns2 Trace Files


    BEGIN {

    seqno = -1;

    start_time = 0;

    }

    {

    action = $1;

    time = $2;

    node_id = $3;

    layer = $4;

    flags = $5;

    seqno = $6;

    type = $7;

    size = $8;

    a = $9;

    b = $10;

    c = $11;

    d = $12;

    energy = $14;

    if(seqno < $6 && node_id == "_4_" && (action == "r" || action == "s")) {

    seqno = $6;

    remaining_energy = energy;

    start_time = time;

    printf("%f\t%f\n",start_time,remaining_energy);


    }
    }

    END {

    }