Monday, 27 January 2014

AOMDV in ns2

AOMDV is a multi-path extension of the well-known Ad hoc On Distance Vector (AODV) protocol.


Here i have given a tcl code for creation of MANET using AOMDV as a routing protocol.


 #------------------------------------------------------------------------------
# Marco Fiore's Patch
# ------------------------------------------------------------------------------
#remove-all-packet-headers                                                     ;# removes all except common
#add-packet-header IP LL Mac AODV AOMDV ATR DSDV DSR OLSR UDP TCP CBR FTP      ;# needed headers
Mac/802_11 set CWMin_                 31
Mac/802_11 set CWMax_                 1023
Mac/802_11 set SlotTime_              0.000020                     ;# 20us
Mac/802_11 set SIFS_                  0.000010                     ;# 10us
Mac/802_11 set PreambleLength_        144                         ;# 144 bit
Mac/802_11 set ShortPreambleLength_   72                           ;# 72 bit
Mac/802_11 set PreambleDataRate_      1.0e6                        ;# 1Mbps
Mac/802_11 set PLCPHeaderLength_      48                           ;# 48 bits
Mac/802_11 set PLCPDataRate_          1.0e6                        ;# 1Mbps
Mac/802_11 set ShortPLCPDataRate_     2.0e6                        ;# 2Mbps
Mac/802_11 set RTSThreshold_          3000                         ;# bytes
Mac/802_11 set ShortRetryLimit_       7                            ;# retransmissions
Mac/802_11 set LongRetryLimit_        4                            ;# retransmissions
Mac/802_11 set newchipset_            false                        ;# use new chipset, allowing a more recent  packet to be correctly received in place of the first sensed packet
Mac/802_11 set dataRate_ 11Mb                                      ;# 802.11 data transmission rate
Mac/802_11 set basicRate_ 1Mb                                      ;# 802.11 basic transmission rate 
Mac/802_11 set aarf_ false                                         ;# 802.11 Auto Rate Fallback
#------------------------------------------------------------------------------
# Defining options
# ------------------------------------------------------------------------------
set val(chan) Channel/WirelessChannel                              ;# channel type
set val(ant) Antenna/OmniAntenna                                   ;# antenna type
set val(propagation) Shado ;# propagation model
set val(netif) Phy/WirelessPhy                                     ;# network interface type
set val(ll) LL                                                     ;# link layer type
set val(ifq) Queue/DropTail/PriQueue                               ;# interface queue type
set val(ifqlen) 50                                                 ;# max packet in ifq
set val(mac) Mac/802_11                                            ;# MAC type
set val(rp) AOMDV ;# routing protocol
set val(n) 16.0 ;# node number
set val(density) 4096 ;# node density [node/km^2]
set val(end) 2060.0                                                ;# simulation time [s]
set val(mobility) Static ;# mobility model
set val(minSpeed) 0.5                                              ;# movement minimum speed [m/s]
set val(maxSpeed) 1.5                                              ;# movement maximum speed [m/s]
set val(minPause) 0.0                                              ;# movement minimum pause time [s]
set val(maxPause) 0.0                                              ;# movement maximum pause time [s]
set val(movementStart) 950.0                                       ;# movement start time [s]
set val(traffic) Node-UDP ;# data pattern
set val(dataStart) 1000.0                                          ;# data start time [s]
set val(dataStop) [expr $val(end) - 60.0]                          ;# data stop time [s]
set val(seed) 1 ;# general pseudo-random sequence generator
set val(macFailed) true                                            ;# ATR protocol: ns2 MAC failed callback
set val(etxMetric) true                                            ;# ATR protocol: ETX route metric
set val(throughput) 5.4 ;# CBR rate (<= 5.4Mb/s)
set val(flow) 100                                                  ;# number of concurrent data flow for FLOW-**P data pattern
set val(nodes) $val(n)                                             ;# number of concurrent transmitting nodes for NODE-**P data pattern


# ------------------------------------------------------------------------------
# Fixing DSR bug
# ------------------------------------------------------------------------------
if {$val(rp) == "DSR"} {
set val(ifq) CMUPriQueue
}
# ------------------------------------------------------------------------------
# Channel model
# ------------------------------------------------------------------------------
Antenna/OmniAntenna set X_ 0
Antenna/OmniAntenna set Y_ 0
Antenna/OmniAntenna set Z_ 1.5
Antenna/OmniAntenna set Gt_ 1                                      ;# transmitter antenna gain
Antenna/OmniAntenna set Gr_ 1                                      ;# receiver antenna gain
Phy/WirelessPhy set L_ 1.0                                         ;# system loss factor (mostly 1.0)
if {$val(propagation) == "TwoRay"} {                               ;# range tx = 250m 
set val(prop) Propagation/TwoRayGround
set prop [new $val(prop)]
Phy/WirelessPhy set CPThresh_ 10.0                         ;# capture threshold in Watt
Phy/WirelessPhy set CSThresh_ 1.559e-11                    ;# Carrier Sensing threshold
Phy/WirelessPhy set RXThresh_ 3.652e-10                    ;# receiver signal threshold
Phy/WirelessPhy set freq_ 2.4e9                            ;# channel frequency (Hz)
Phy/WirelessPhy set Pt_ 0.28                               ;# transmitter signal power (Watt)
}
if {$val(propagation) == "Shado"} {
set val(prop) Propagation/Shadowing
set prop [new $val(prop)]
$prop set pathlossExp_ 3.8                                 ;# path loss exponent
$prop set std_db_ 2.0                                      ;# shadowing deviation (dB)
$prop set seed_ 1                                          ;# seed for RNG
$prop set dist0_ 1.0                                       ;# reference distance (m)
$prop set CPThresh_ 10.0                                   ;# capture threshold in Watt
$prop set RXThresh_ 2.37e-13                               ;# receiver signal threshold
$prop set CSThresh_ [expr 2.37e-13 * 0.0427]               ;# Carrier Sensing threshold
$prop set freq_ 2.4e9                                      ;# channel frequency (Hz)
Phy/WirelessPhy set Pt_ 0.28
}
# ------------------------------------------------------------------------------
# Topology definition
# ------------------------------------------------------------------------------
#Creazione dello scenario in funzione della densita' di nodo scelta
set val(dim) [expr $val(n) / $val(density)] 
set val(x) [expr [expr sqrt($val(dim))] * 1000]
set val(y) [expr [expr sqrt($val(dim))] * 1000]

# ------------------------------------------------------------------------------
# Pseudo-random sequence generator
# ------------------------------------------------------------------------------

# General pseudo-random sequence generator
set genSeed [new RNG]
$genSeed seed $val(seed)
set randomSeed [new RandomVariable/Uniform]
$randomSeed use-rng $genSeed
$randomSeed set min_ 1.0
$randomSeed set max_ 100.0

# Mobility model: x node position [m]
set genNodeX [new RNG]
$genNodeX seed [expr [$randomSeed value]]
set randomNodeX [new RandomVariable/Uniform]
$randomNodeX use-rng $genNodeX
$randomNodeX set min_ 1.0
$randomNodeX set max_ [expr $val(x) - 1.0]

# Mobility model: y node position [m]
set posNodeY [new RNG]
$posNodeY seed [expr [$randomSeed value]]
set randomNodeY [new RandomVariable/Uniform]
$randomNodeY use-rng $posNodeY
$randomNodeY set min_ 1.0
$randomNodeY set max_ [expr $val(y) - 1.0]

# Mobility model: node speed [m/s]
set genNodeSpeed [new RNG]
$genNodeSpeed seed [expr [$randomSeed value]]
set randomNodeSpeed [new RandomVariable/Uniform]
$randomNodeSpeed use-rng $genNodeSpeed
$randomNodeSpeed set min_ $val(minSpeed)
$randomNodeSpeed set max_ $val(maxSpeed)

# Mobility model: node movement pause [s] 
set genNodePause [new RNG]
$genNodePause seed [expr [$randomSeed value]]
set randomNodePause [new RandomVariable/Uniform]
$randomNodePause use-rng $genNodePause
$randomNodePause set min_ $val(minPause)
$randomNodePause set max_ $val(maxPause)

# Data pattern: node
set genNode [new RNG]
$genNode seed [expr [$randomSeed value]]
set randomNode [new RandomVariable/Uniform]
$randomNode use-rng $genNode
$randomNode set min_ 0
$randomNode set max_ [expr $val(n) - 1]

# Data pattern "Random": flow start time [s]
set genStartData [new RNG]
$genStartData seed [expr [$randomSeed value]]
set randomStartData [new RandomVariable/Uniform]
$randomStartData use-rng $genStartData
$randomStartData set min_ $val(dataStart)
$randomStartData set max_ $val(dataStop)

# Data pattern "Full: flow start time [s]
set genStartDataFull [new RNG]
$genStartDataFull seed [expr [$randomSeed value]]
set randomStartDataFull [new RandomVariable/Uniform]
$randomStartDataFull use-rng $genStartDataFull
$randomStartDataFull set min_ 0
$randomStartDataFull set max_ [expr ($val(n) * ($val(n) - 1)) - 1]

# Data pattern: flow end time [s]
set genEndData [new RNG]
$genEndData seed [expr [$randomSeed value]]
set randomEndData [new RandomVariable/Uniform]
$randomEndData use-rng $genEndData
$randomEndData set min_ 0.0
$randomEndData set max_ [expr $val(end) - $val(dataStart) - 20]


# ------------------------------------------------------------------------------
# General definition
# ------------------------------------------------------------------------------
;#Instantiate the simulator
set ns [new Simulator]
;#Define topology
set topo [new Topography]
$topo load_flatgrid $val(x) $val(y)
;#Create channel
set chan [new $val(chan)]
$prop topography $topo
;#Create God
create-god $val(n)
;#Global node setting
$ns node-config -adhocRouting $val(rp) \
-llType $val(ll) \
-macType $val(mac) \
-ifqType $val(ifq) \
-ifqLen $val(ifqlen) \
-antType $val(ant) \
-propInstance $prop \
-phyType $val(netif) \
-channel $chan \
-topoInstance $topo \
-agentTrace ON \
-routerTrace ON \
-macTrace OFF \
-movementTrace OFF

# ------------------------------------------------------------------------------
# Trace file definition
# ------------------------------------------------------------------------------

#New format for wireless traces
$ns use-newtrace

#Create trace object for ns, nam, monitor and Inspect
set nsTrc [open ns.trc w]
$ns trace-all $nsTrc
set namTrc [open nam.trc w] 
$ns namtrace-all-wireless $namTrc $val(x) $val(y)
set scenarioTrc [open scenario.trc w]

proc fileTrace {} {
global ns nsTrc namTrc
global ns nsTrc scenarioTrc
$ns flush-trace 
close $nsTrc
close $scenarioTrc
close $namTrc
exec nam nam.trc &
}


# ------------------------------------------------------------------------------
# Nodes definition
# ------------------------------------------------------------------------------
;#  Create the specified number of nodes [$val(n)] and "attach" them to the channel.
for {set i 0} {$i < $val(n) } {incr i} {
set node($i) [$ns node] 
$node($i) random-motion 0        ;# disable random motion
}

# ------------------------------------------------------------------------------
# Nodes mobility
# ------------------------------------------------------------------------------
#parameters for trace Inspect
puts $scenarioTrc "# nodes: $val(n), max time: $val(end)"
puts $scenarioTrc "# nominal range: 250"

if {$val(mobility) == "Static"} {
for {set i 0} {$i < $val(n)} {incr i} { 
set X [expr [$randomNodeX value] ]
$node($i) set X_ $X
set Y [expr [$randomNodeY value] ]
$node($i) set Y_ $Y
$node($i) set Z_ 0.0
$ns initial_node_pos $node($i) 20
puts $scenarioTrc "\$node_($i) set X_ $X"
puts $scenarioTrc "\$node_($i) set Y_ $Y"
puts $scenarioTrc "\$node_($i) set Z_ 0.0"
}
}


# ------------------------------------------------------------------------------
# Data load
# ------------------------------------------------------------------------------
if {$val(traffic) == "Node-UDP"} {
for {set i 0} {$i < $val(nodes)} {incr i} {
set udp($i) [new Agent/UDP]
$ns attach-agent $node($i) $udp($i)
set dest [expr round([$randomNode value])]
while {$dest == $i} {
set dest [expr round([$randomNode value])]
}
set monitor($dest) [new Agent/LossMonitor]
$ns attach-agent $node($dest) $monitor($dest)
$ns connect $udp($i) $monitor($dest)
set cbr($i) [new Application/Traffic/CBR]
$cbr($i) attach-agent $udp($i)
$cbr($i) set packetSize_ 1000
$cbr($i) set random_ false
$cbr($i) set rate_ [expr $val(throughput) / [expr $val(n) * sqrt($val(n))]]Mb
# $cbr($i) set rate_ [expr $val(throughput)]Mb
$ns at [expr $val(dataStart) + [$randomSeed value]] "$cbr($i) start"
$ns at $val(dataStop) "$cbr($i) stop"
# $ns at [expr [$randomStartData value]] "$cbr($i) start"
# set endData [expr [$randomStartData value] + [$randomEndData value]]
# if {$endData > $val(dataStop)} {
# set endData $val(dataStop)
# }
# $ns at $endData "$cbr($i) stop"
}
}


# ------------------------------------------------------------------------------
# Tracing
# ------------------------------------------------------------------------------

# printing simulation time
proc timeTrace { tracePause} {
global ns
    set now [$ns now]
    $ns at [expr $now + $tracePause] "timeTrace $tracePause"
    puts "$now simulation seconds"
}

$ns at 10.0 "timeTrace 10.0"

#$ns at 500 "[$node(0) agent 255] storeInfo id1 tex#t1"
#$ns at 500 "[$node(0) agent 255] storeInfo id2 text2"

#$ns at 520 "[$node(0) agent 255] requestInfo id1"

# ------------------------------------------------------------------------------
# Starting & ending
# ------------------------------------------------------------------------------
for {set i 0} {$i < $val(n) } {incr i} {
    $ns at $val(end) "$node($i) reset";
}

$ns at $val(end) "fileTrace"
$ns at $val(end) "$ns halt"

$ns run

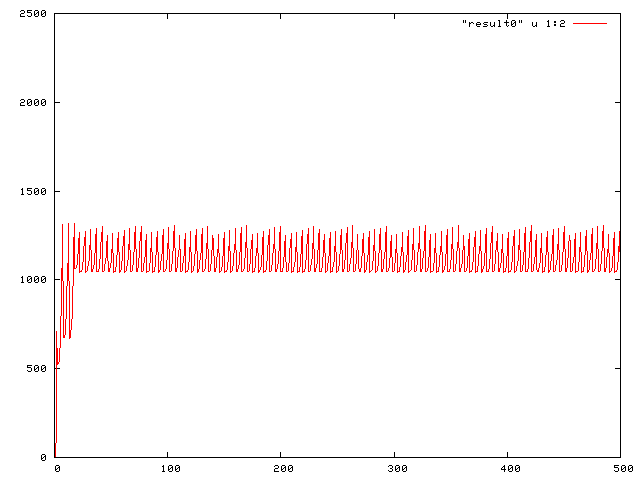
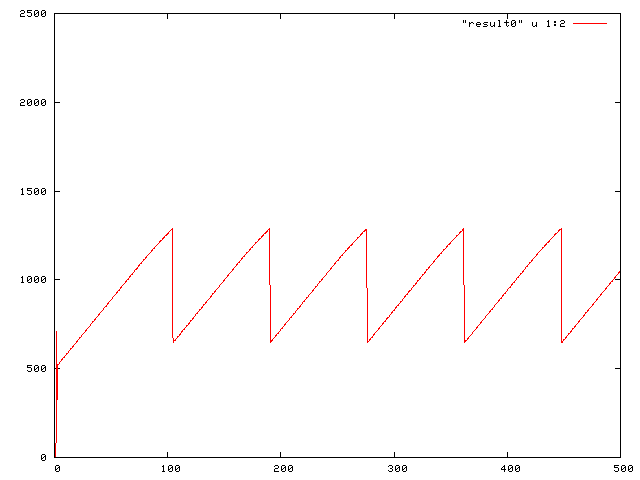
the output of the above code is,


Friday, 24 January 2014

Cloud Simulation using netbeans and java

Step1
open Netbeans (any version greater then 5.0) ,Go to  file-->>new project
   
Step 2


 select "Java" folder then select first option java Application ,Press next


Step3
Now give name to the project as you wish ,then un-check the "create main class" press next.

                                                                               Step 4
Now your project is been created as shown.
Step5

 Go to library ,right click on it ,a menu will come ,click on "Add jars/Folders"
                                                                          Step6
Now browse the cloudsim folder which you have extracted from zip file .and go to  "cloudsim-2.1.1\jars" and select "cloudsim-2.1.1.jar" .
Step 7
Now simply copy the  "org" folder in "cloudsim-2.1.1\examples" and paste it to net beans source folder as shown.go to source and right click select paste.
Step 8
To run the example go to source ->> org.cloudbus.cloudsim.examples->>select any example ,right click on it and select "run" option the output will be displayed in the output window at the bottom.


         TO RUN EXAMPLE CODE FROM SOURCE CODE

Step 1,2,3,4 remain the same  in step 5 copy and paste   "org" folder from "cloudsim-2.1.1\source" and paste it into the source folder of  your netbeans project as you copied the example folder.

Thursday, 23 January 2014

Simple MANET topology in ns2

This is a sample Tcl script for simple manet topology creation,


# ======================================================================

# Define options for 

# ======================================================================

 set val(chan)         Channel/WirelessChannel  ;# channel type

 set val(prop)         Propagation/TwoRayGround ;# radio-propagation model

 set val(ant)          Antenna/OmniAntenna      ;# Antenna type

 set val(ll)           LL                       ;# Link layer type

 set val(ifq)          Queue/DropTail/PriQueue  ;# Interface queue type

 set val(ifqlen)       200                      ;# max packet in ifq

 set val(netif)        Phy/WirelessPhy          ;# network interface type

 set val(mac)          Mac/802_11               ;# MAC type

 set val(nn)           7                       ;# number of mobilenodes

 set val(rp)           AODV                     ;# Bio sensor routing protocol

 set val(x)            670

 set val(y)            510
source config        

set n(0) [$ns node]

$ns at 0.0 "$n(0) color red"

$n(0) color green

$n(0) shape "circle"
$ns at 0.0 "$n(0) label sensor"
set n(1) [$ns node]

$ns at 0.0 "$n(1) color red"

$n(1) color green

$n(1) shape "circle"
$ns at 0.0 "$n(1) label sensor"
set n(2) [$ns node]

$ns at 0.0 "$n(2) color red"

$n(2) color green

$n(2) shape "circle"
$ns at 0.0 "$n(2) label sensor"
set n(3) [$ns node]

$ns at 0.0 "$n(3) color darkgreen"

$n(3) color green

$n(3) shape "circle"

$ns at 0.0 "$n(3) label Sink"
set n(4) [$ns node]

$ns at 0.0 "$n(4) color red"

$n(4) color green

$n(4) shape "circle"
$ns at 0.0 "$n(4) label sensor"

set n(5) [$ns node]

$ns at 0.0 "$n(5) color red"

$n(5) color green

$n(5) shape "circle"
$ns at 0.0 "$n(5) label sensor"
set n(6) [$ns node]

$ns at 0.0 "$n(6) color red"

$n(6) color green

$n(6) shape "circle"

$ns at 0.0 "$n(6) label sensor"

for {set i 0} {$i < $val(nn)} {incr i} {

        $ns initial_node_pos $n($i) 30

}

$ns at 0.0 "$n(0) setdest 645.0 378.0 30000.0"

$ns at 0.0 "$n(1) setdest 233.0 371.0 30000.0"

$ns at 0.0 "$n(2) setdest 113.0 366.0 30000.0"

$ns at 0.0 "$n(3) setdest 392.0 474.0 30000.0"
                                                                                         

$ns at 0.0 "$n(4) setdest 415.0 184.0 30000.0"

$ns at 0.0 "$n(5) setdest 410.0 65.0 30000.0"

$ns at 0.0 "$n(6) setdest 413.0 259.0 20000.0"

# CONFIGURE AND SET UP A FLOW
set sink0 [new Agent/LossMonitor]

set sink1 [new Agent/LossMonitor]

set sink2 [new Agent/LossMonitor]

set sink3 [new Agent/LossMonitor]

set sink4 [new Agent/LossMonitor]

set sink5 [new Agent/LossMonitor]

set sink6 [new Agent/LossMonitor]
#==========

$ns attach-agent $n(0) $sink0

$ns attach-agent $n(1) $sink1

$ns attach-agent $n(2) $sink2

$ns attach-agent $n(3) $sink3

$ns attach-agent $n(4) $sink4

$ns attach-agent $n(5) $sink5

$ns attach-agent $n(6) $sink6

#==============

#$ns attach-agent $sink2 $sink3

set tcp0 [new Agent/TCP]

$ns attach-agent $n(0) $tcp0

set tcp1 [new Agent/TCP]

$ns attach-agent $n(1) $tcp1

set tcp2 [new Agent/TCP]

$ns attach-agent $n(2) $tcp2

set tcp3 [new Agent/TCP]

$ns attach-agent $n(3) $tcp3

set tcp4 [new Agent/TCP]

$ns attach-agent $n(4) $tcp4

set tcp5 [new Agent/TCP]

$ns attach-agent $n(5) $tcp5

set tcp6 [new Agent/TCP]

$ns attach-agent $n(6) $tcp5

proc attach-CBR-traffic { node sink size interval } {

   #Get an instance of the simulator

   set ns [Simulator instance]

   #Create a CBR  agent and attach it to the node

   set cbr [new Agent/CBR]

   $ns attach-agent $node $cbr

   $cbr set packetSize_ $size

   $cbr set interval_ $interval


   #Attach CBR source to sink;

   $ns connect $cbr $sink

   return $cbr

  }
$ns color 0 brown
proc finish {} {

        global ns f namtrace

        $ns flush-trace

        close $namtrace

        #close $f0

        exec nam log.nam &

        exit 0

}
$ns at 5.0 "$n(1) setdest 323.0 371.0 30.0"

$ns at 5.0 "$n(2) setdest 11.0 366.0 30.0"                                                                              

$ns at 2.0 "$n(4) setdest 195.0 234.0 30.0"

$ns at 3.0 "$n(5) setdest 41.0 135.0 30.0"

$ns at 4.0 "$n(6) setdest 443.0 259.0 20.0"

#===

set data [attach-CBR-traffic $n(5) $sink3 500 .2]


set data1 [attach-CBR-traffic $n(1) $sink3 500 .05]


#==

$ns at 0.3 "$data start"

$ns at 4.0 "$data1 start"


$ns at 15.0 "finish"

#===========

puts "Start of simulation.."

$ns run

#==============

Linux TCP implementation for NS2


This is a patch that can run Linux TCP congestion control algorithms on NS2, with similar simulation speed and memory usages as other NS2 TCPs (e.g. Sack1). The implementation loosely follows the Linux TCP implementation, and can produce results comparable to Linux experimental results. The patch is for NS-2.31 and compatible with 2.29 and 2.30. You may need some modification if you want to install it for other versions.


Patch for NS-2.31:

The patch can be downloaded from here. It is for NS-2.31 and compatible with 2.29 and 2.30. To install the patch, you need to take the following steps, assuming you have successfully installed and run NS-2.31 in your computer:
  1. Copy the patch to ns-allinone-2.31/ns-2.31
  2. In the directory of ns-allinone-2.31/ns-2.31 , run: make clean
  3. In the directory of ns-allinone-2.31/ns-2.31 , run: patch -p1 < ns-linux-v2.patch
  4. (Optional) delete the patch file by rm ns-linux-v2.patch
  5. recompile the ns2 by make and make install
The patch changes the following files:
  • tcp/tcp-linux.h, tcp/tcp-linux.cc: (new files) the NS-2 TCP Linux module
  • tcp/tcp.cc: (modifiying old file) fixed a bug in sending timestamp array (for delay-based algorithms)
  • tcp/scoreboard1.h and tcp/scoreboard1.cc: (new files) the Linux-like scoreboard implementation
  • tcp/linux/: (new files) this directory is added to hold the linkages between C++ codes in NS2 and C codes in Linux
  • tcp/linux/src/: (new files) this directory is added to hold source codes of Linux TCP congestion control modules
  • Makefile: (modifying old file) to include a list of new files to be compiled
  • tcl/lib/ns-default.tcl: (modifying old file) to add default values to control variables in TCP-Linux
  • tcl/test/test-all-tcpLinux and tcl/test/test-suite-tcpLinux.tcl: (new files) added for NS-2 compatible validation tests
  • tcl/ex/tcp-linux/ (new files): two example files on running TCP-Linux
  • doc/ns.bib and doc/tcp.tex (modifying old files): documentation files
  • This patch also includes a scheduler improvement patch to speed up the simulation.

Legacy patch for NS-2.29 with interface in Linux-2.6.16 kernels

The old patch for NS-2.29 with congestion control interface for Linux 2.6.13-2.6.20 kernels can be found here. (Linux changes its congestion control interface in 2.6.22.) This old version is no longer supported. However, bug fixes and patches from other contributors to this project will still be published.

Usage:

This section serves as a quick reference for users who want to run different Linux TCP algorithms in the TCP Linux patch.
There is a mini-tutorial for TCP Linux . Please read the mini-tutorial for details if you want to design your own algorithms or port new algorithms from Linux to NS-2.
If you find some performance problem of some Linux algorithms, please check the known Linux bugs page to make sure it is really the problem of the algorithm, not a bug in Linux implementation.

1. Normal Usage:

The TCP-Linux module is call "Agent/TCP/Linux".  If you have an existing script that runs TCP and want to change to TCP-Linux, what you need to do is:
  1. Change the TCP Agent's name (e.g. Agent/TCP/Sack1) to Agent/TCP/Linux.
  2. Make sure the TCP Sink has Sack1 support. That is, either you are using Agent/TCPSink/Sack1 or Agent/TCPSink/Sack1/DelAck . Currently, TCP-Linux does not support receivers without SACK.
  3. Optional but recommended: change the window_ option in tcp agent to be large enough. This option is the upper bound of congestion window. It is 20 by default in NS-2. Most congestion control algorithms work the same if the congestion window is bounded by 20. The recommended value is at least bandwidth-delay-product.
  4. Before starting the simulation, add one command:
$ns at 0 "$tcp select_ca $TCP_Name"
where $ns is the NS-2 scheduler you are using in the script, and $TCP_Name is the congestion control algorithm you want to select. 

2. Basic behavior:

The patch comes with 14 different congestion control algorithms from Linux-2.6.22.6, as listed in the following table.
Please see the tcl script for the simulation details; see the control shell script for the configuration of the simulations; and the gnuplot script for how the figures are generated.
$TCP_NameCongestion Control Algorithmcwnd dynamic of a single flow (RTT=128ms, BW=100Mbps, buffer=220pkt)
bicBinary Increase Congestion control for TCP 
cubicTCP CUBIC: Binary Increase Congestion control for TCP v2.0 , an extension of BIC-TCP
highspeedSally Floyd's High Speed TCP (HS-TCP RFC 3649) congestion control
htcpHamilton TCP (H-TCP) congestion control
hyblaTCP-HYBLA Congestion control algorithm
renoTCP NewReno
Note that this "NewReno" also includes implementation of SACK and Fack.
scalableTom Kelly's Scalable TCP
vegasTCP Vegas congestion control
westwoodTCP Westwood+
venoTCP Veno
lpTCP Low-Priority (TCP-LP)
yeahYeAH-TCP 
illinoisTCP Illinois 
compoundTCP Compound (C-TCP)(Last updated for 2.6.22.9 kernel.) Please be very careful about compound module as this module has been discontinued in the kernel code base since 2.6.17. It is here for research purpose only and the interface of this module might be out-dated for the latest kernel. We do try our best to keep the module's interface up-to-date. Extra care is still recommended for validating the results with this module. And please let us know if there is any problem.

3. Advanced Usage 

Changing parameters in a congestion control module in the simulation
You can change the parameters of a congestion control module during the simulation.
Add a command to change the global value of a parameter for all flows running a congestion control module:
$ns at $ChangeTime "$tcp set_ca_default_param $TCP_Name $Parameter_Name $Parameter_Value"
where $ns is the NS-2 scheduler you are using in the script, $TCP_Name is the congestion control algorithm in concern, $Parameter_Name is the variable name of the parameter, and $Parameter_Value is the new value of the parameter.
Effect is taken on all the flows which run the $TCP_Name and without defining their own local value for this parameter. (Flows which has used set_ca_param to define a local value for this parameter will not be affected.)

Add a command to change the local value of a parameter for a particular flow running a congestion control module:
$ns at $ChangeTime "$tcp set_ca_param $TCP_Name $Parameter_Name $Parameter_Value"
where $ns is the NS-2 scheduler you are using in the script, $TCP_Name is the congestion control algorithm in concern, $Parameter_Name is the variable name of the parameter, and $Parameter_Value is the new value of the parameter. Effect is taken on this particular flow ($tcp). Other flows are not affected. And the value of this parameter for this particular flow ($tcp) will not be affected by any future command ofset_ca_default_param.
For details, please refer to the tutorial.
Adding your own congestion control module
You can add your own congestion control module once you develop the module in Linux.
If you decide to do so, take the following steps:
  1. Make sure your implementation is compliant to the congestion control structure in Linux (struct tcp_congestion_ops);
  2. Make sure this patch has been applied to your NS2 code base
  3. Follow the migration step in tutorial to migrate your whole Linux congestion control modules (including your own) to NS-2 code base.
  4. add a record in Makefile by adding an item to let compiler know your code:
    tcp/linux/YourCode.o
  5. compile, run and compare the simulation results with Linux experiments results
You might encounter one of the following problems in the last step:
  1. If your algorithm requires access to many new fields in Linux TCP structure, you might need to add more fields to struct tcp_sock in tcp/linux/ns-linux-util.h .

WARNING: After adding a new congestion control algorithm, please verify the simulation results extensively and carefully to make sure the simulation is running as expected.


Here is a list of known problems:
  1. The implementation does not change receiver part. The delayed ack implementation in Linux might be different from the one in NS-2. This may results in some performance difference
  2. D-SACK: This may leads to performance difference in scenarios with packet reordering.
  3. F-RTO: Not yet implemented. Will be included very soon.
  4. ECN: The implementation is not extensively verified.
  5. TCP Segmentation: Not implemented. Will NOT be covered in the near future.
  6. Buffer tuning: Not implemented. Will NOT be covered in the near future.
For more details,

http://netlab.caltech.edu/projects/ns2tcplinux/ns2linux/

Saturday, 18 January 2014

NS-2 Dynamic Source Routing 


  1. What happens to a packet when it is received by DSR?
  2. What happens to the packet if it is for this node?
  3. How do I add a packet type of my own?
  4. How do I get a node to maliciously alter/drop packets?
  5. How do I get one in ten nodes to maliciously alter/drop packets?
  6. How do I intentionally drop one in ten packets?
  1. Where are the available routes stored?
  2. How are routes added?
  3. How is a route selected?
  4. How can these caches be purged?
  5. Mobicache is in cache used in DSR...but where is it that defined?
  6. I want to use an alternate metric for route selection?
  7. Can DSR be altered to use "multipath"?
  8. I want to make the source node and the destination node have two or more communication paths so I can select one as the primary and the other as a backup. I've setup these two routes (by node placement), but DSR only uses one of them?
  9. Does DSR support multicast?
  10. Where is the route of a packet stored?
  11. How can the srpacket be examined/altered?
  12. How can the route of a packet be viewed?
  13. Dumping the route from the first few packets works, but not with subsequent packets?
  14. How is an srpacket constructed from a packet of type Packet?
  15. Does the route in the packet header have to be used?
  16. How can the route be altered?
  17. How do I tell what type of packet it is?
  1. How can I tell what node code is currently executing on?
  1. Where are packets queued before delivery to the mac?
  2. What is the cmu-priqueue class?
  3. How are packets added to the queue?
  4. How do I get the length of the queue?
  1. How does the following piece of code work?
  1. How is a packet created?
  2. How is a packet sent?
  3. How is a broadcast packet sent?
  1. How is flow state turned off?
  2. What is the next hop for a packet?
  3. How can a piece of code be called repeatedly by a timer?
  4. Can I tell the c code how many nodes are in the simulation?
  5. I get a Segmentation fault when I run a DSR script?
  6. How does a node tell how many neighbours it has?
  7. How do I turn off promiscuous mode?
  8. How do I debug my code?
  9. Why is there no information about the MAC in the trace files?
  1. What application gives a nice visual representation of classes and how they relate?
  2. How do I add my own information to the trace files?
  3. How do I analyse trace files?
  4. I've made changes to somefile, but when I run the simulation nothing has changed?
  1. What is the status of DSR?
  1. What happens to a packet when it is received by DSR?
    It first arrives at
    recv(Packet* packet, Handler*)
    it is checked to see if it has a source route, if no source route is present, it may be a broadcast packet.
    If so, it is checked to see if it is an outgoing or incoming broadcast packet

    If the packet was not a broadcast, it must have been an outgoing packet and a route is found for it.

    If the packet did have a source route, the destination of the packet is checked against the node's net_id and the broadcast address. If the destination matches either of these the packet is sent to
    handlePacketReceipt(p);
    for further processing

    if the destination does not match either address, the packet must be a route request, route error(if snooping is enabled), a packet to be forwarded or an invalid packet. It is processed accordingly.
  2. What happens to the packet if it is for this node?
    The packet will be dealt with by
        handlePacketReceipt(p);

    here it is checked to see if it is a route reply, route request, route error…

    it is in this method that you can add all calls to your own methods to processing coming packets.

    A route reply packet is recognised by
        if (srh->route_reply()) {
            acceptRouteReply(p); //and handled by this
        }

    srh->route_reply() is a call to a method in hdr_sr.h

    which checks if an int in a struct is set or not.
  3. How do I add a packet type of my own?
    You can add your own structures to identify that particular packets have certain properties, this is done in hdr_sr.h

    For example if you added a

        struct encryption_state{
            int enc_valid_; /*encryption header is valid? */
            int enc_type_; /*type of encryption used */
        };

    along with this structure you would have

        struct encryption_state enc_state_;
        .
        .
        .
        inline int& encryption_valid() {return enc_state_.enc_valid_; }
        inline int& encryption_type() {return enc_state_.enc_type_; }

    the above both check and set the values in the structure.
  4. How do I get a node to maliciously alter/drop packets?
    Take a look at the questions one and two above.
    Add in the criteria at the appropriate point. e.g. if you want to alter all packets to be forwarded, insert your code before the call to     handleForwarding(p);

    Or place your code within the handleForwarding method.
  5. How do I get one in ten nodes to maliciously alter/drop packets? 
    Use a simple modulus command on the node id.
    To get the node id see question How can I tell what node code is currently executing on?
  6. How do I intentionally drop one in ten packets?
    See the ns-2 manual chapter on Error Models.
  7. Where are the available routes stored?
    in primary_cache and secondary_cache in mobicache.cc
  8. How are routes added?
    Routes can be added as the result of receiving a route reply (after sending a route request) or by overhearing a route used (or routing information) in a packet destined for another node.

    Routes discovered from a route reply are added to the primary cache.
        void MobiCache::addRoute(const Path& route, Time t, const ID& who_from) {
         
                .
                (void) primary_cache->addRoute(rt, prefix_len);
                .
         }


    Routes discovered by overhearing a packet are added to the secondary cache.

         void MobiCache::noticeRouteUsed(const Path& p, Time t, const ID& who_from) {
            .
            .
            (void) secondary_cache->addRoute(stub, prefix_len);
            .
         }

    the above methods call
    Path* Cache::addRoute(Path & path, int &common_prefix_len) { ... }
  9. How is a route selected?
    searchRouote(..) selects routes from the cache that which lead to the
    requested destination.

    searchRoute(..) is called by findRoute(..)

    Each time searchRoute(..) finds a route to the destination, findRoute(..)
    checks if it is the shortest known route found so far.

    seachRoute(..) continues checking every route in the cache and
    findRoute(..) keeps a record of the shortest one.

    the code in findRoute(..) that does this is :
        while (primary_cache->searchRoute(dest, len, path, index))  {
            min_cache = 2;
            if (len < min_length) {
                min_length = len;
                route = path;
            }
        index++;
        }


    len is the lenght of the route just found
    path is the route just found by seachRoute(..)
    route is the route that was passed to findRoute(..) by the caller.
    index is the location in the route cache that will be checked next

    the secondary cache is then checked in a similar manner.
  10. How can these caches be purged?
    This may not be the best way, but it should work –

        delete primary_cache;
        delete secondary_cache;

        primary_cache = new Cache("primary", 30, this);
        secondary_cache = new Cache("secondary", 64, this);
  11. Mobicache is in cache used in DSR...but where is it that defined? 
    The code for the other caches is not compiled, this leaves mobicache as the only available cache. See the following lines in #ifdef DSR_LINKCACHE and #ifdef DSR_SIMPLECACHE.
  12. I want to use an alternate metric for route selection?
    The way that DSR selects a route for a particular packet is controlled by the mobicache.cc file, as explained above.
    Make alterations to this file.
  13. Can DSR be altered to use "multipath"?
    See the previous question.
  14. I want to make the source node and the destination node have two or more communication paths so I can select one as the primary and the other as a backup. I've setup these two routes (by node placement), but DSR only uses one of them?
    So it could happen that in your network DSR is aware of a route route between node X and node Y which uses the route

    X - A - B - C - D - E - F - Y

    and on visualy or other inspection you see that it's a better route

    X - K - J - Y

    but unless this route has been discovered (through a route discovery or by overhearing its use) by X or Y, they cannot know about it.

    What might help make this clear is to use static nodes in an arragement in which two routes between a source/destination pair exists, a long route and a shout route.

    However, create the topology so that the short route will not work until after the longer route has been established and is functioning. You could do this by leaving a gap in the short route and then moving the a node to fill the gap.

    DSR will continue to use the long route because it is not aware of the short route.
  15. Does DSR support multicast?
    As of draft-ietf-manet-dsr-10 (the latest document I know of), it does not.
  16. Where is the route of a packet stored?
    seems to be in srpacket.h
        struct SRPacket {
            .
            .
            Path route;
            .
         }
  17. How can the srpacket be examined/altered?
    There are various methods in the hdr_sr.h and path.cc/h files that allow you to examine and alter everything about the packet.
  18. How can the route of a packet be viewed?
    where p is an SRPacket use - p.route.dump()
  19. Dumping the route from the first few packets works, but not with subsequent packets?
    Check for the following -
        static const bool dsragent_enable_flowstate = true;
    If it's there, you are using flow state, this does not use headers in packets once a route has been established. See the draft for details.
  20. How is an srpacket constructed from a packet of type Packet?
        hdr_sr *srh = hdr_sr::access(packet);
        SRPacket p(packet, srh);
  21. Does the route in the packet header have to be used?
    as far as I know, yes. But you can alter the route or remove it, see below
  22. How can the route be altered?
    for an SRPacket p do the following

        p.route = new_route;// whatever route you want to use
        p.route.resetIterator(); //may not need to do this, sets cur_index = 0 
        cmh->size() -= srh->size();
        p.route.fillSR(srh);
  23. How do I tell what type of packet it is?
    cmh->ptype() //returns a string
  24. How can I tell what node code is currently executing on?
    use net_id.dump(), this is the code used by the trace mechanism
  25. Where are packets queued before delivery to the mac?
    see next question
  26. What is the cmu-priqueue class?
    This is the class in which packets are placed, according to their priority before being delivered to the MAC. There are four priority queue, but there is no reason that you couldn’t add more. The higher the priority of the queue, the sooner a packet will be sent from that queue
  27. How are packets added to the queue?
    Packets are added using the following or similar statements, they can be found in dsragent.cc

        Scheduler::instance().schedule(ll, p, 0.0);
  28. How do I get the length of the queue?
    There are four queues for the different kinds of packet. see dsr-priqueue.cc/h
    To get the lenght of any of these queues use -

        queue_lenght = prq_snd_[queue_number].ifq_len;
  29. How does the following piece of code work?
    This piece of code is in dsragent.cc

        Packet *r, *nr, *queue1 = 0, *queue2 = 0;
        // pkts to be recycled
        while((r = ifq->prq_get_nexthop(to_id.getNSAddr_t()))) {
        r->next_ = queue1;
        queue1 = r;

    my understanding is that
    *r, *nr, *queue1 and *queue2 are pointers to some packets
    which link to each other by the packet->next_
    together, these packets make up the queue of packets in a particular queue
  30. How is a packet created?
        SRPacket p;
        p.src = net_id;
        p.pkt = allocpkt();

        hdr_sr *srh = hdr_sr::access(p.pkt);
        hdr_ip *iph = hdr_ip::access(p.pkt);
        hdr_cmn *cmnh = hdr_cmn::access(p.pkt);
  31. How is a packet sent?
    Scheduler::instance().schedule(ll, p.pkt, 0.0);
    This schedules the packet p.pkt to be send in 0.0 seconds to the link layer output.
  32. How is a broadcast packet sent?
    do something like –
        SRPacket p;
        p.src = net_id;
        p.pkt = allocpkt();

        hdr_sr *srh = hdr_sr::access(p.pkt);
        hdr_ip *iph = hdr_ip::access(p.pkt);
        hdr_cmn *cmnh = hdr_cmn::access(p.pkt);

        iph->daddr() = IP_BROADCAST; iph->dport() = RT_PORT;
        iph->saddr() = Address::instance().create_ipaddr(net_id.getNSAddr_t(),RT_PORT);
        iph->sport() = RT_PORT;
        iph->ttl() = 1;

        cmnh->ptype() = PT_DSR;
        cmnh->size() = size_ + IP_HDR_LEN; // add in IP header


        srh->init();

        Scheduler::instance().schedule(ll, p.pkt, 0);

        p.pkt = NULL;
  33. How is flow state turned off?
    static const bool dsragent_enable_flowstate = false;
  34. What is the next hop for a packet?
    srh->get_next_addr() or cmh->next_hop()
  35. How can a piece of code be called repeatedly by a timer?
    the easiest way is to use SendBufferTimer::expire(Event *) method. Add your call to this and it will be executed approximately every 1/3 seconds.
  36. Can I tell the c code how many nodes are in the simulation?
    int num_nodes = God::instance()->nodes();
  37. I get a Segmentation fault when I run a DSR script?
    Change
    set opt Queue/DropTail/PriQueue
    to
    set opt CMUPriQueue
  38. How does a node tell how many neighbours it has?
    From the cache, a node is able to guess what neighbours it has. Iterate through the paths in the cache, taking the first node in each path to be your immediate neighbour.
    Problem is that some or many may be out of date.
  39. How do I turn off promiscuous mode?
    In dsragent.cc
    Set
    bool dsragent_use_tap = false;
    // should we listen to a promiscuous tap?
  40. How do I debug my code?
    I found this useful: http://heather.cs.ucdavis.edu/~matloff/debug.html
  41. Why is there no information about the MAC in the trace files?
        $ns_ node-config -adhocRouting $val(adhocRouting) \
            -llType $val(ll) \
            -macType $val(mac) \
            -ifqType $val(ifq) \
            -ifqLen $val(ifqlen) \
            -antType $val(ant) \
            -propType $val(prop) \
            -phyType $val(netif) \
            -channelType $val(chan) \
            -topoInstance $topo \
            -agentTrace ON \
            -routerTrace OFF \
            -macTrace ON
                             ^^^
    setting -macTrace ON
  42. What application gives a nice visual representation of classes and how they relate?
    Source navigator from Redhat and Source Insight are pretty good.
  43. How do I add my own information to the trace files?
    Simply add your own trace command typically something like -
    trace("X %.5f _%s_ %s",Scheduler::instance().clock(),net_id.dump(), your.info);
    where X identifies the type of event, then the time and node id are added to the trace and finally your.info
  44. How do I analyse trace files?
    Awk or perl scripts are the most common. But any programming language can be used.

    If programming is not your thing(!), try trace graph  http://www.tracegraph.com
  45. I've made changes to somefile, but when I run the simulation nothing has changed? 
    Delete *.o from the ~ns/dsr directory and dsr-priqueue.o from the ~ns/queue directory.
    Then recompile...
  46. What is the status of DSR?
    The DSR specification has been submitted to the IESG for publication as Experimental RFC.